
Exploring DKOM for Process Hiding on Windows
In this post we will explore the DKOM (Direct Kernel Object Manipulation) technique, a well-known stealth method used by advanced malware and rootkits on Windows systems to hide processes from standard system monitoring tools.
What is DKOM?
DKOM stands for Direct Kernel Object Manipulation.
It is a technique that operates directly on kernel data structures in memory. Instead of hooking APIs or patching the kernel, DKOM modifies kernel objects in place, leaving no hooks that can be detected with integrity checks.
One common use case:
- Hiding a process by directly altering the kernel’s doubly-linked list of
EPROCESSstructures.
When a process is created in Windows, the kernel allocates an EPROCESS structure that describes it.
Each EPROCESS contains a member called ActiveProcessLinks, which is a doubly-linked list (FLINK/BLINK) pointing to the previous and next process.
The Windows API functions and tools like Task Manager, Process Explorer or pslist traverse this list to enumerate active processes.
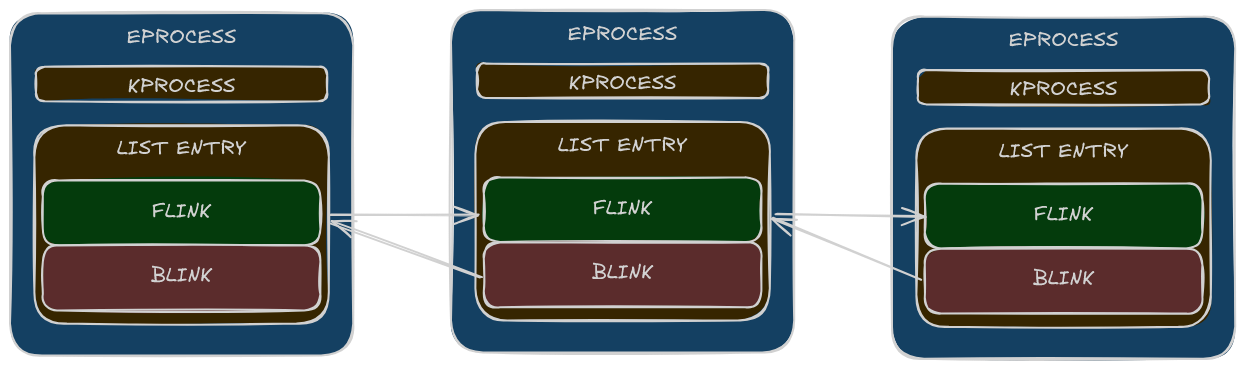
By manipulating these pointers, an attacker can:
- Unlink the target process from the
ActiveProcessLinkslist:- Adjust
FlinkandBlinkpointers of the neighboring nodes so they skip the target. - The
EPROCESSobject itself remains allocated in memory, but is no longer part of the list.
- Adjust
- As a result:
- Standard enumeration APIs (
NtQuerySystemInformation, WMI, etc.) will not report the hidden process. - Security tools relying only on this list will not see the process, although it continues to execute.
- Standard enumeration APIs (
- The hidden process can still be detected by:
- Direct memory scanning (e.g.,
Volatility psscan) because the structure still exists in RAM. - Kernel callbacks or ETW events that do not depend on list walking.
- Direct memory scanning (e.g.,
This unlinking technique is the essence of DKOM-based process hiding. No hooks, no patching, just surgical manipulation of in-memory linked lists inside the kernel.
Hiding a Process with WinDbg
Preparing the Environment
Before experimenting with DKOM on Windows, it is crucial to work in a controlled lab environment to avoid damaging a production system.
For this PoC you will need:
- A Windows test machine (physical or virtual) dedicated to research and malware analysis.
- A VM (e.g., Hyper-V, VMware, VirtualBox) is recommended for snapshot/rollback capabilities.
- Kernel debugging must be enabled on the target machine if you plan to attach remotely.
Tools Required
WinDbg(Preview or Classic)- Obtain from the Microsoft Store or the Windows SDK.
Administrator Privileges
- Run
WinDbgwith elevated privileges to access live kernel memory.
- Run
Target Process
- Launch a simple process (e.g.,
notepad.exe) that will be used as a target to demonstrate hiding.
- Launch a simple process (e.g.,
✏️ Note: Recent versions of
WinDbg(Preview) automatically configure and download symbols from the Microsoft symbol server. Manual configuration is usually not required unless you need a custom symbol path or offline cache.
Kernel Debugging Setup
If your PoC involves live kernel debugging (recommended for DKOM analysis):
- Configure debugging transport (COM, TCP, or local):
- For VMs, named pipe (COM) or network KD is most convenient.
- Enable kernel debugging on the target:
# Administrator
bcdedit /debug on
- Reboot the machine with debugging enabled.
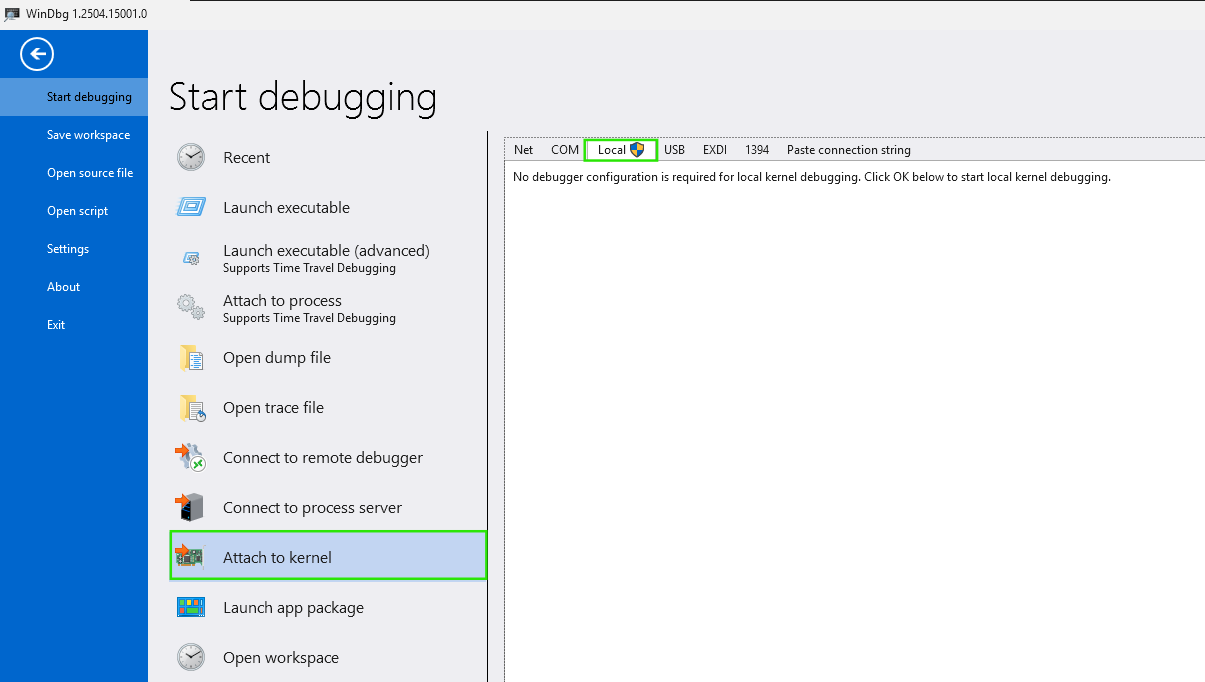
💡 Tip: For local debugging, use
WinDbg->File->Start Debugging->Attach to kernel->Local.
Verification
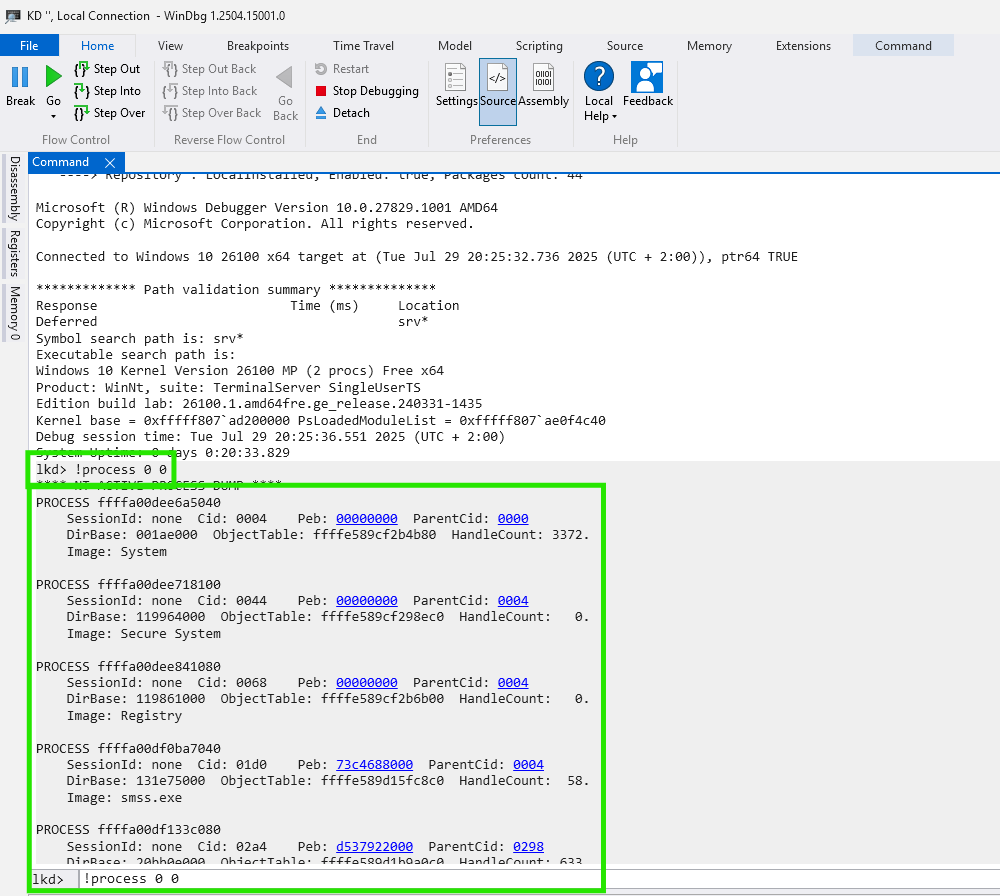
After attaching WinDbg to the live kernel or memory dump verify the debugger connection:
!process 0 0
This should list all active processes.
With the environment ready, you will be able to inspect, modify and unlink EPROCESS structures manually
Identify addresses to manipulate
Follow these steps to hide a process using DKOM in a controlled lab environment:
- Identify the Target Process
- Use the
!process 0 0command in WinDbg to list all active processes. - Find the entry for your target process (e.g.,
notepad.exe) and note itsEPROCESSaddress.
- Use the
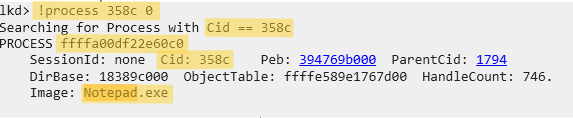
| Process Name | PID | EPROCESS Address |
|---|---|---|
| Notepad.exe | 0x358c | ffffa00df22e60c0 |
- Locate the ActiveProcessLinks Field
- Display the structure of the
EPROCESSobject using:
- Display the structure of the
dt _EPROCESS <EPROCESS_address>

- Locate the
UniqueProcessIdfield, inWindows 11 24h2offset is+0x1d0 - Locate the
ActiveProcessLinksfield, which is part of the doubly linked list connecting all processes, inWindows 11 24h2the offset is+0x1d8. - Locate the
ImgageFileNamefield, inWindows 11 24h2offset is+0x338
| Field | Offset (Windows 11 24h2) | Description |
|---|---|---|
| UniqueProcessId | EPROCESS + 0x1d0 | Unique identifier for the process |
| ActiveProcessLinks | EPROCESS + 0x1d8 | Pointer to the doubly-linked list of processes |
| ImageFileName | EPROCESS + 0x338 | Executable file name of the process |
- Read the
FlinkandBlinkpointers from theActiveProcessLinksfield.
# Abstract
dt nt!_EPROCESS <EPROCESS_address> ActiveProcessLinks
dq <EPROCESS_address> + <ActiveProcessLinks_offset> L2

# Our case
dt nt!_EPROCESS ffffa00df22e60c0 ActiveProcessLinks
dq ffffa00df22e60c0 + 0x1d8 L2

| Process Name | PID | EPROCESS Address | ActiveProcessLinks | FLINK | BLINK |
|---|---|---|---|---|---|
| Notepad.exe | 0x358c | ffffa00df22e60c0 | ffffa00df22e6298 | ffffa00df7ecc258 | ffffa00dfa0e2258 |
- Gather Information on Neighboring Processes (PID and ImageFileName)
- Identify the processes
ImageFileNameimmediately before and after your target in the linked list by examining theFlinkandBlinkpointers, use their respective +/- offsets (see the above table) to inspect their details:
- Identify the processes
# -0x1d8 is EPROCESS base address offset from ActiveProcessLinks member
# +0x338 is the `ImageFileName` member offset from EPROCESS base address

da  ffffa00d`f7ecc258 - 0x1d8 + 0x338
da  ffffa00d`fa0e2258 - 0x1d8 + 0x338

- Identify the
UniqueProcessIdandEPROCESSaddresses of the neighboring processes. - For each neighboring process, use their respective
ActiveProcessLinks+/- offsets (see the above table) to inspect their details:
# --- Get forward process Pid - WidgetBoard.exe
dd ffffa00df7ecc258 - 0x1d8 + 0x1d0 L1

# --- Get forward process EPROCESS Address - WidgetBoard.exe
!process 2ba0 0

# --- Get forward process ActiveProcessLinks, FLINK, BLINK - WidgetBoard.exe
dt nt!_EPROCESS ffffa00df7ecc080 ActiveProcessLinks
dq ffffa00df7ecc080 + 0x1d8 L2
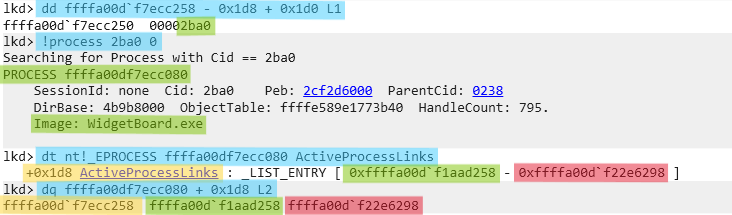
| Position | Process Name | PID | EPROCESS Address | ActiveProcessLinks | FLINK Value +0 | BLINK Value +8 |
|---|---|---|---|---|---|---|
| Forward | WidgetBoard.exe | 2ba0 | ffffa00df7ecc080 | ffffa00df7ecc258 | ffffa00df1aad258 | ffffa00df22e6298 |
# --- Get backward process Pid - EngHost.exe
dd ffffa00d`fa0e2258 - 0x1d8 + 0x1d0 L1

# --- Get backward process EPROCESS Address - EngHost.exe
!process 3660 0

# --- Get backward process ActiveProcessLinks, FLINK, BLINK - EngHost.exe
dt nt!_EPROCESS ffffa00dfa0e2080 ActiveProcessLinks
dq ffffa00dfa0e2080 + 0x1d8 L2

| Position | Process Name | PID | EPROCESS Address | ActiveProcessLinks | FLINK Value +0 | BLINK Value +8 |
|---|---|---|---|---|---|---|
| Backward | EngHost.exe | 3660 | ffffa00dfa0e2080 | ffffa00dfa0e2258 | ffffa00df22e6298 | ffffa00df3ea2258 |
- Note the
Process ID (PID),ImageFileName,EPROCESS,ActiveProcessLinks,FLINK,BLINKfor both neighboring processes. This ensures you are correctly identifying the links you need to update when unlinking the target process.
| Position | Process Name | PID | EPROCESS Address | ActiveProcessLinks | FLINK Value +0 | BLINK Value +8 |
|---|---|---|---|---|---|---|
| Backward | EngHost.exe | 3660 | ffffa00dfa0e2080 | ffffa00dfa0e2258 | ffffa00df22e6298 | ffffa00df3ea2258 |
| Notepad.exe | 358c | ffffa00df22e60c0 | ffffa00df22e6298 | ffffa00df7ecc258 | ffffa00dfa0e2258 | |
| Forward | WidgetBoard.exe | 2ba0 | ffffa00df7ecc080 | ffffa00df7ecc258 | ffffa00df1aad258 | ffffa00df22e6298 |
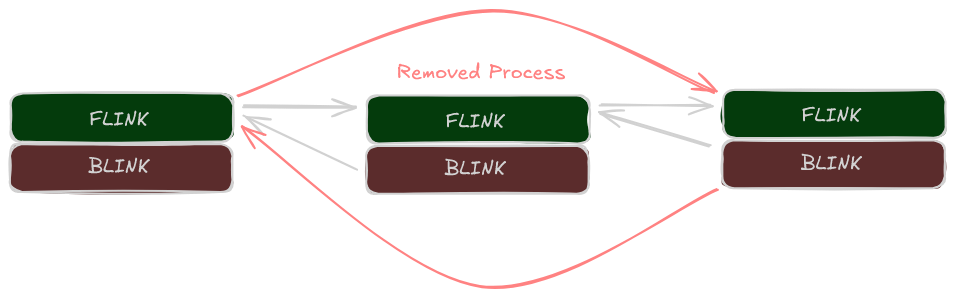
Unlink the Process To manipulate these links and remove the
Notepad.exeprocess from the active list, update the following pointers usingActiveProcessLinksaddress:- Point
EngHost.exe->FLINKin ffffa00dfa0e2258toWidgetBoard.exe->FLINKin ffffa00df7ecc258
eq ffffa00d`fa0e2258 ffffa00d`f7ecc258- Point
WidgetBoard.exe->BLINKat ffffa00df7ecc258 + 8toEngHost.exe->FLINKat ffffa00dfa0e2258.
# ActiveProcessLinks+8 because LIST_ENTRY has two FLINK/BLINK fields and each is 8 bytes
eq ffffa00d`f7ecc258 + 8 ffffa00d`fa0e2258
- Point
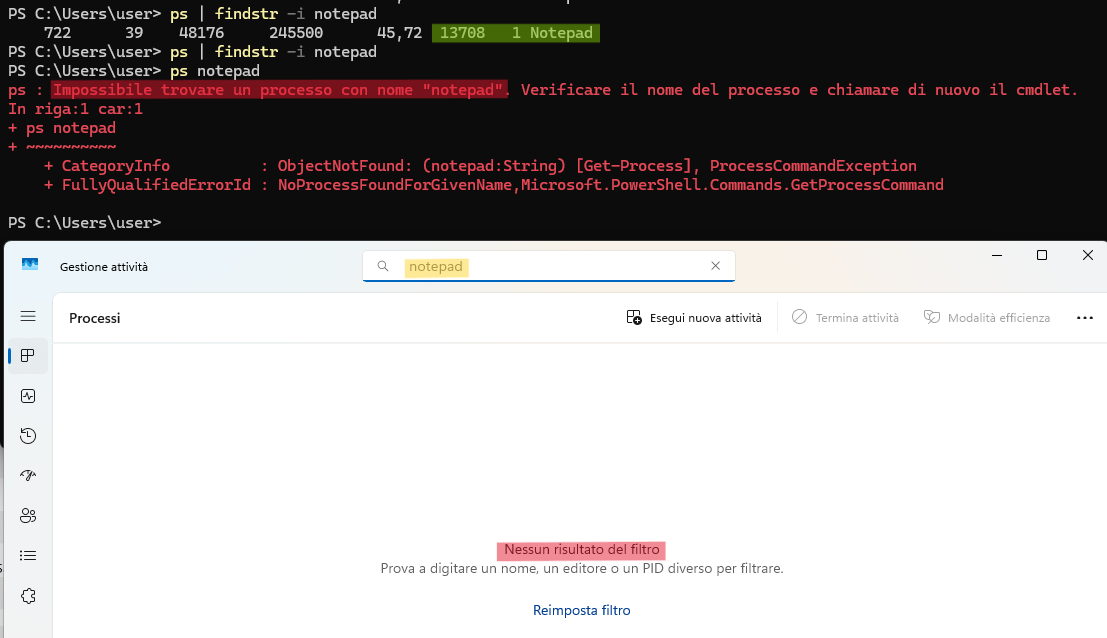
Verify the Process is Hidden
- Run
ps | findstr -i notepadin teminal or usingTaskManager. The target process (Notepad.exe) should no longer appear in the list, even though it is still running.
- Run
⚠️ Warning:
Modifying kernel memory can destabilize or crash the system. Always work in a disposable test environment and take snapshots before making changes.
This procedure demonstrates how DKOM can be used to hide a process by manipulating kernel data structures directly.
How to detect DKOM for Process Hiding on Windows
In order to detect unlinked processes exhibited by malware on systems without PatchGuard, explore psscan and psxview from Volatility.
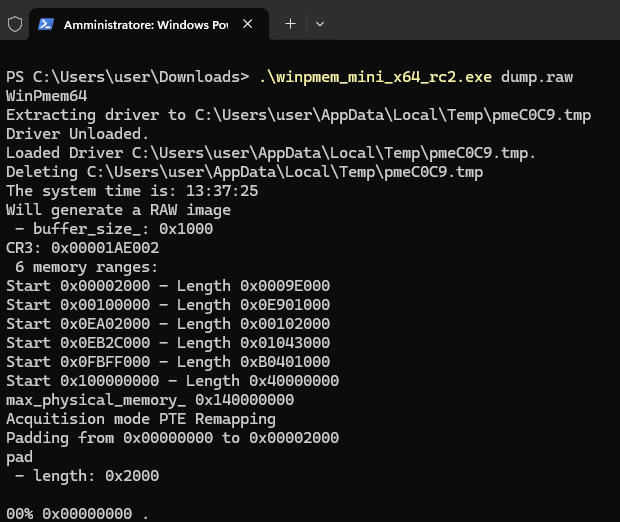
You need to acquire a memory image. One of the most popular tools for this on Windows is winpmem.
Download winpmem
Get the latest release from the official GitHub repository.
Run as Administrator
Open a command prompt with administrative privileges.
Acquire the Memory Dump
Use the following command to dump memory from the target host to a file:
.\winpmem_mini_x64_rc2.exe dump.raw
Check the Image
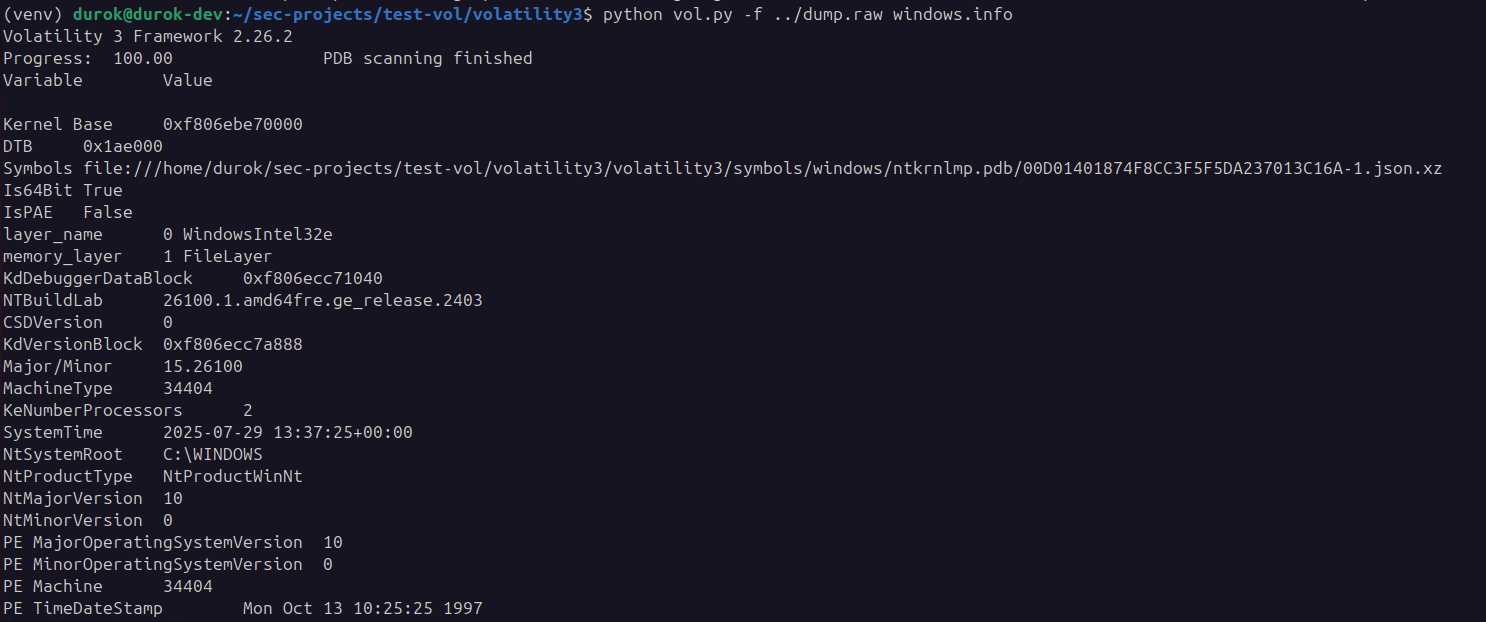
Install Volatility on linux forensic machine and use windows.info module
python vol.py -f ../dump.raw windows.info
Analyze with Volatility
As we can see, running the windows.pslist module and filtering for the process name notepad returns no results, meaning the process is not visible to standard enumeration:
python vol.py -f ../dump.raw windows.pslist | grep -i notepad

No output is produced, confirming that notepad.exe is hidden from pslist due to DKOM unlinking. However, by using psscan or psxview, you can still detect the hidden process because these modules scan memory for EPROCESS structures directly, rather than relying on the linked list.
To detect hidden processes using psscan in Volatility and redirect the output to a file, run:
python vol.py -f ../dump.raw windows.psscan > psscan.txt
cat psscan.txt | grep -i notepad
This command scans memory for EPROCESS structures, revealing processes that have been unlinked from the active process list.

Here, notepad.exe is found in memory with PID 10188 (different test from the previous with Windbg), confirming that the process exists even though it was hidden from standard process listings.
You can also use the psxview module in Volatility to compare multiple process enumeration techniques in a single output. This module shows which processes are visible to each method, making DKOM-based hiding immediately apparent.
python vol.py -f ../dump.raw windows.psxview > psxview.txt
cat psxview.txt | grep -i notepad
The output will display columns for each enumeration method (such as pslist, psscan, thrdproc, etc.). If a process is hidden via DKOM, you will see False under pslist but True under psscan, confirming the discrepancy:

This makes psxview a powerful module for quickly identifying processes hidden by DKOM, as it highlights inconsistencies across different detection techniques in a single table.
Conclusion
In this post, we explored the fundamentals of DKOM (Direct Kernel Object Manipulation) for process hiding on Windows, including a practical walkthrough using WinDbg and detection strategies with Volatility. DKOM remains a powerful and stealthy technique for evading standard process enumeration, but it is not foolproof—memory forensics and advanced detection tools can still reveal hidden processes. By learning how DKOM works and how to detect it, you can better protect systems against sophisticated threats.
Thank you for your attention! 😊
If you have questions or want to share your experience with DKOM or process hiding techniques, feel free to leave a comment or reach out on GitHub.